It’s a heart-stopping moment: you pick up your phone and see the message, "iPhone is disabled." It feels like a catastrophic failure, but it’s actually your iPhone’s security system doing its job. After too many incorrect passcode attempts, your device locks down to protect your data.
The only way back in is to erase and restore your iPhone using iCloud, a Mac, or a PC. This process wipes the forgotten passcode, but it also wipes your data. Don't panic just yet—if you have a recent backup, you can get everything back once the phone is accessible again.
Why Does an iPhone Get Disabled in the First Place?

That "iPhone is disabled" screen isn't a bug; it's a powerful security feature Apple designed to keep your private information safe. Think of it as your digital bouncer. When someone—you, a toddler, or a would-be thief—punches in the wrong passcode repeatedly, the iPhone assumes it's under attack and locks itself down. It’s the last line of defence for your photos, messages, and banking apps.
The lockout isn't immediate. It starts with minor delays and quickly ramps up with each wrong guess, effectively shutting down any brute-force attempt to guess your passcode.
The Escalating Lockout Timeline
The lockout sequence is designed to give you a chance to remember your passcode before things get serious. Here’s a quick look at what’s happening behind the scenes with each failed attempt.
To make sense of the messages you're seeing, here's a quick reference guide.
Understanding iPhone Disabled Messages
| Incorrect Passcode Attempts | Lockout Message | Required Wait Time | What This Means For You |
|---|---|---|---|
| 1–5 | None | None | You can keep trying your passcode without any penalty. |
| 6 | iPhone is disabled, try again in 1 minute | 1 minute | This is your first warning. Take a moment to think. |
| 7 | iPhone is disabled, try again in 5 minutes | 5 minutes | The wait time is increasing. Still a chance to get it right. |
| 8 | iPhone is disabled, try again in 15 minutes | 15 minutes | The phone is taking more serious defensive measures. |
| 9 | iPhone is disabled, try again in 1 hour | 1 hour | Your last chance before the device locks you out for good. |
| 10 | iPhone is disabled, connect to computer | Permanent | Game over. You can no longer enter a passcode on the device. |
Once you hit that tenth incorrect attempt, your only path forward is a full restore.
This isn't some rare, obscure problem. With iOS holding a 57.53% market share in Australia as of October 2025, it’s an issue we see all the time. With over 13 million active iPhone users, industry data suggests around 8% of them face a lockout each year. That’s about 1 million people in the same boat. You can dive deeper into these numbers with Australian mobile usage insights on StatCounter.
It’s incredibly frustrating, I know. But try to remember this feature is what stops a stranger from accessing your life if your phone gets lost or stolen.
The Data Dilemma
Here’s the part that really matters: once your iPhone is permanently disabled, the only official way to unlock it is by completely erasing its contents and settings. This process removes the passcode, but it takes all your data with it.
If you have a recent backup in iCloud or on a computer, you can restore your data and be back up and running in no time. But if you haven't backed up your iPhone, that data is unfortunately gone for good. This situation is a tough lesson in the importance of regular backups—something we’ll cover in more detail later. For now, understanding why this happened is the first step to fixing it.
The Quickest Fix Using iCloud Find My

If you're staring at that dreaded "iPhone is disabled" screen, there’s one method that stands out for its sheer speed and simplicity. Using iCloud and its Find My feature is often the fastest way to get your device working again, but it all hinges on one crucial bit of foresight.
This approach lets you remotely erase your iPhone from any web browser, completely bypassing the need for a computer. You can borrow a mate’s phone, use your work laptop, or grab an iPad to log into your Apple account and kickstart the process. As long as your disabled iPhone has an internet connection and you had Find My enabled before it got locked, you're in business.
The Critical Prerequisite Explained
Let's be crystal clear about what you need for this to work. Find My isn't something you can switch on after the fact; it’s a security feature you had to have enabled beforehand.
To pull this off, you absolutely must have:
- Your Apple ID and password. There's no getting around this. It's your key to iCloud.
- An active internet connection on the disabled iPhone (Wi-Fi or mobile data).
- Find My enabled on the device before it was disabled.
If you can tick all those boxes, you’ve got a direct and efficient path forward. If not, don’t stress—you’ll just need to skip ahead to the methods that involve connecting to a computer.
Initiating the Remote Erase Process
First things first, you'll need to head over to the iCloud website. The great part is you can do this from any device with a web browser, whether it's a Mac, a Windows PC, or another phone.
Open your browser and navigate to iCloud.com. You'll need to sign in with the same Apple ID that's on your disabled iPhone. Once you're in, you'll see a dashboard of your iCloud apps. Look for the "Find Devices" (or "Find My") icon and click it. A map will pop up showing the last known location of all the Apple devices tied to your account.
Now, just select your disabled iPhone from the device list. This will bring up a small menu with a few options for that specific device.
Heads Up: This process completely wipes your iPhone. It deletes all your data and settings, including the passcode that locked you out. This is a non-negotiable security step to regain access.
With your device selected on the map, you'll see three options: Play Sound, Lost Mode, and Erase iPhone. The one you want is "Erase iPhone."
Apple will ask for confirmation, giving you one last chance to back out and reminding you that this will delete everything. Go ahead and confirm. As soon as your iPhone connects to the internet, it will receive the command and begin the erasure process.
Once it's done, the phone will restart to the "Hello" screen, just like it was brand new. This is where having a recent backup really pays off, as you can now restore all your personal data and get back to normal.
Restoring Your iPhone with a Mac or PC
When you can't get into your iPhone through iCloud, plugging it into a computer is your next best bet. A physical connection gives you the direct access needed to force a reset and wipe that forgotten passcode for good. The tool you'll use depends on your computer—a modern Mac uses Finder, while a Windows PC or an older Mac relies on the classic iTunes—but the outcome is exactly the same: a fresh, factory-reset iPhone.
Let's be crystal clear: just like the iCloud method, this process erases everything on your iPhone. It's a full wipe, designed to protect your data if the phone is lost or stolen. This is why having a recent backup is so important. Without one, you're starting over from scratch once you get back in.
This isn't an uncommon problem. In fact, here in Australia, the demand for unlocking services has shot up, partly due to a booming second-hand phone market. Globally, the phone unlocking industry was valued at over USD 2.35 billion in 2025, and local repair shops like ours have seen a 35% increase in requests for disabled iPhones just between 2022 and 2025. It’s a common issue, and thankfully, a fixable one. You can dig into the numbers in this Phone Unlocking Service Market report from WiseGuyReports.
Using Finder on a Modern Mac
If you’re on a Mac running macOS Catalina (10.15) or anything newer, Apple has streamlined the process by building iPhone management right into Finder. No more iTunes needed.
First, connect your disabled iPhone to the Mac with a good quality Lightning or USB-C cable. Open a Finder window, and you should see your iPhone pop up in the sidebar under the "Locations" heading. Click on it.
Now, because your phone is locked, your Mac probably won't be able to communicate with it properly. This is completely normal. The next step is to get the phone into Recovery Mode, a special state that allows your Mac to see the device and perform a restore. We'll walk you through the exact steps for your specific model in the next section.
Using iTunes on a Windows PC or Older Mac
For anyone using a Windows PC or an older Mac with macOS Mojave (10.14) or earlier, your tool is the trusted iTunes application. The process is functionally the same as with Finder, just with a different look and feel.
Make sure you've got the latest version of iTunes installed to prevent any weird compatibility bugs. Plug in your iPhone and launch the app. A little phone icon should appear in the top-left area of the iTunes window—click it to get to the device summary screen.
Like with Finder, a disabled iPhone will almost certainly refuse to connect. The solution is the same: you'll need to manually put the device into Recovery Mode to force the connection.
Key Insight: Once you're in Recovery Mode, both Finder and iTunes will give you two options: Update or Restore. You must choose Restore. The 'Update' button tries to reinstall iOS without touching your data, but it can't bypass a passcode. Only 'Restore' will completely erase the device, taking the passcode with it.
Comparing Unlocking Methods: iCloud vs Computer
Stuck on which method to use? This quick table breaks down the pros and cons to help you decide what’s best for your situation.
| Feature | iCloud Find My | Finder or iTunes Restore | Best For |
|---|---|---|---|
| Requirements | Apple ID & password, phone online, Find My on | A Mac or Windows PC, a reliable USB cable | When you don't have access to a trusted computer. |
| Speed | Very fast and can be done from anywhere. | Slower, as it requires downloading the iOS file. | When Find My is off or the iPhone has no internet connection. |
| Reliability | Relies on a stable internet connection to work. | Extremely reliable due to the physical connection. | For stubborn devices or when troubleshooting software issues. |
| Data Impact | Wipes all data and settings completely. | Also wipes all data and settings completely. | Both methods are a last resort and require a backup for recovery. |
Ultimately, both paths lead to the same destination: a clean, unlocked iPhone. The computer method is just a more powerful, hands-on approach when the remote iCloud option isn't available.
Troubleshooting Common Connection Issues
Sometimes your computer just refuses to see your iPhone, or the restore process fails with a cryptic error message. It happens.
Before you panic, try these simple fixes:
- Check your cable and USB port. This is the number one culprit. A dodgy cable or a loose port can cause the connection to fail. Try a different port and, if possible, an official Apple or MFi-certified cable.
- Restart everything. A good old-fashioned reboot of both your computer and your iPhone can clear up a surprising number of software glitches.
- Update your software. Make sure your Mac is running the latest macOS and your PC has the newest version of iTunes. Outdated software can cause all sorts of communication problems.
If you’ve tried these and are still stuck, it’s almost certain you’ll need to force the connection with Recovery Mode. It's the go-to solution for uncooperative devices.
What If Nothing Else Works? Time for Recovery Mode
So, you’ve tried a standard restore and your computer just won't see your iPhone. Maybe iCloud Find My wasn't set up. This is where we pull out the heavy artillery: Recovery Mode. It's a powerful failsafe that forces your iPhone to talk to a computer, cutting through whatever software glitch or lockout is causing the problem.
Think of it as a master key. It bypasses the locked-up operating system entirely, giving your computer a direct line to wipe the device and start fresh. This is our go-to method in the workshop when a standard restore through Finder or iTunes hits a wall, especially after a botched iOS update or when the phone's software is too corrupted to be recognised. It might sound a bit technical, but it’s really just a specific sequence of button presses.
What Exactly Is Recovery Mode?
Every iPhone has a built-in failsafe called Recovery Mode. It's designed specifically for situations where the device can't boot up properly or connect to a computer. When you kick your iPhone into this mode, it immediately signals to your Mac or PC that it's ready for a full factory restore.
Let's be clear: this is a one-way street. Using Recovery Mode will erase everything on your iPhone. But when the alternative is a permanently disabled brick, it's the only reliable way to get your phone working again. This is the same technique technicians use every day to sort out stubborn software problems.
A Quick Tip from the Trenches: Don't get spooked by the name. Recovery Mode is a standard troubleshooting tool, and it's far safer than dodgy third-party programs that promise to save your data (they almost never can). Stick with the official method.
Getting Your iPhone into Recovery Mode
The button combination for entering Recovery Mode has changed over the years, so you need to use the right one for your model. It’s crucial. Get your iPhone connected to your Mac or PC with a cable before you start.
For iPhone 8 and Newer (including iPhone SE 2nd & 3rd gen)
These models use a quick three-button combo. It happens fast, so follow along.
- Press and quickly let go of the Volume Up button.
- Immediately press and quickly let go of the Volume Down button.
- Now, press and hold the Side button on the right. Keep holding it down, even when the Apple logo appears. Don't let go until you see the Recovery Mode screen showing a cable pointing towards a computer.
For iPhone 7 and iPhone 7 Plus
This was when Apple ditched the physical home button, changing the process.
- Press and hold the Side button and the Volume Down button at the same time.
- Keep them both held down. The screen will go black, and then the Apple logo will pop up—keep holding.
- Only release the buttons when the Recovery Mode screen appears.
For iPhone 6s and Older (including iPhone SE 1st gen)
If you've got one of these classics, you'll be using the Home button.
- Press and hold both the Home button and the Top (or Side) button together.
- Continue holding as the device reboots. You’ll see the Apple logo, but don't let go yet.
- Release both buttons only when you see the Recovery Mode screen.
Finishing the Job on Your Computer
Once you've successfully put the iPhone into Recovery Mode, a message will pop up in Finder (on a Mac) or iTunes (on a PC). It will tell you there’s an issue with your iPhone and give you two choices: Update or Restore.
You need to select Restore. Choosing 'Update' tries to reinstall iOS without touching your data, which is useless for a disabled iPhone. Clicking 'Restore' is what you need. It tells the computer to download a fresh copy of the latest iOS and wipe your device clean, taking the forgotten passcode with it.
This download can take a while, and if it drags on for more than 15 minutes, your iPhone might automatically exit Recovery Mode. No stress if that happens—just repeat the button sequence for your model and get it back into Recovery Mode to finish the process.
A Quick Word on DFU Mode
For the most stubborn cases, there’s one last-ditch option: Device Firmware Update (DFU) mode. It's even deeper than Recovery Mode, loading before the iPhone's operating system even starts to boot. This is the ultimate restore, often used to fix complex firmware corruption.
However, getting into DFU mode is fiddly and carries more risk if you get it wrong. Honestly, for 99% of disabled iPhones we see, Recovery Mode is more than enough to get the job done. We'd recommend leaving DFU to the professionals unless you're very technically confident.
Recovering Your Data After Unlocking
Alright, let’s tackle the big question on everyone’s mind: what happens to your photos, contacts, and messages? I’ll be straight with you—every official Apple method for unlocking a disabled iPhone will completely wipe the device. There’s simply no way around it. This is a core security feature designed to protect your data if your phone ever gets lost or stolen.
Once you’ve successfully restored your iPhone, you’ll be greeted by that familiar "Hello" screen, just like when it was new. The device is now a blank slate. The focus immediately shifts from unlocking it to getting your digital life back. This is precisely where a recent backup becomes your lifeline.
The Power of a Recent Backup
As you go through the initial setup steps, your iPhone will ask if you want to restore from a backup. This is the moment you can bring everything back. You'll typically have two options:
- Restore from iCloud Backup: If you had iCloud Backup turned on, your phone was likely saving everything to the cloud automatically. All you need to do is sign in with your Apple ID and pick the most recent backup available.
- Restore from Mac/PC: Did you back up your iPhone to your computer using Finder or the old iTunes? Just connect your iPhone with a cable, select this option, and let the computer restore your data.
This infographic lays out the general flow for restoring your iPhone using a computer, which is a really common approach if an iCloud backup isn't available.
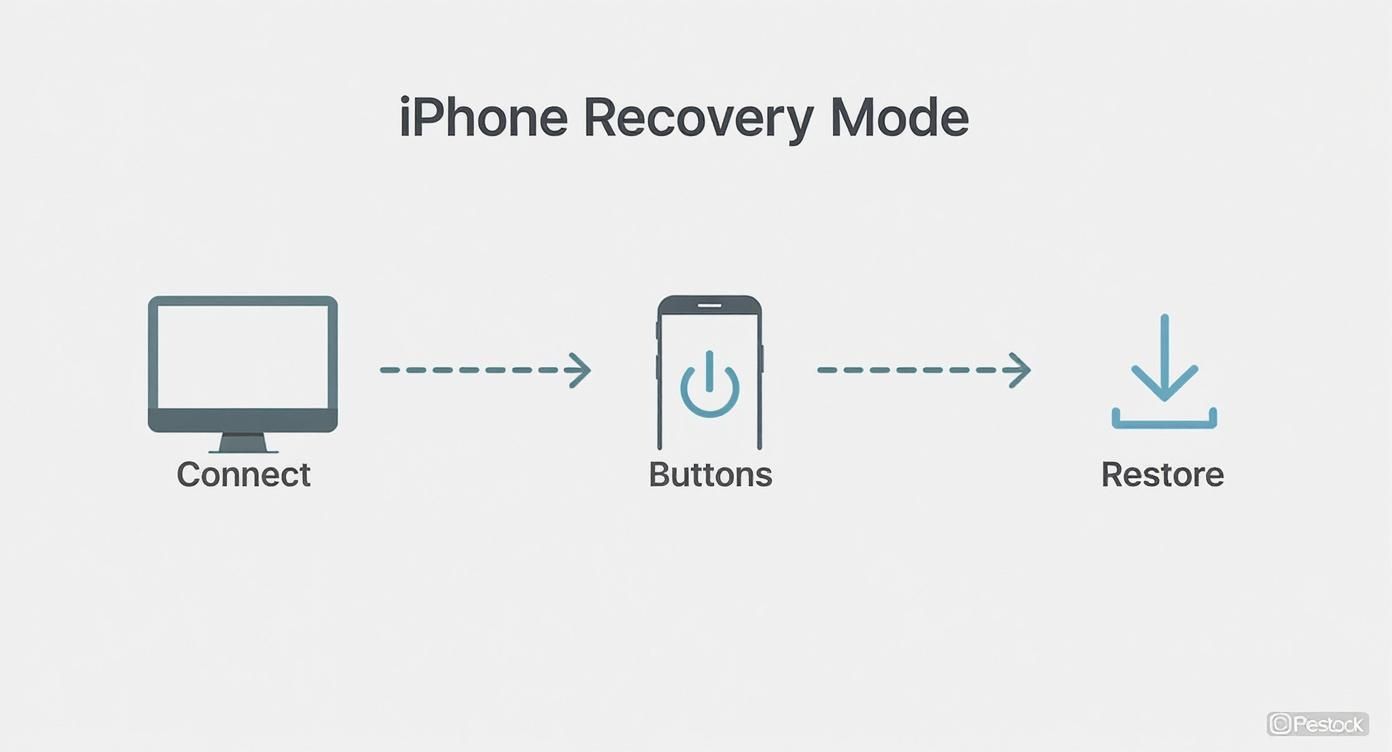
It shows the core process: plug in the device, get it into the right mode, and kick off the restore from your computer.
What If You Don't Have a Backup?
I won't sugar-coat it—this is a tough spot to be in. If you never made a backup, the data that was wiped during the unlock process is, unfortunately, gone for good. This is the harsh reality that makes setting up automatic iCloud backups one of the single most important things any iPhone user can do.
You’ll see countless third-party data recovery tools online claiming they can pull data from a disabled or restored iPhone. My advice? Be incredibly wary. Because of Apple’s robust encryption, the success rate for these services on a passcode-locked device is virtually zero. Many are just expensive scams preying on that feeling of desperation.
For more information on data loss in general, you might find these general data recovery resources helpful. If you’re considering professional help, it’s always smart to https://ctf.com.au/wp-sitemap-posts-post-1.xml/find-data-recovery-services-near-me that have a proven track record.
The rise in disabled iPhone cases in Australia highlights this very problem. With over 1.5 million iPhones resold or traded in during 2025, a significant number were disabled. The average turnaround for a professional unlock is now 24-48 hours, with success rates over 90%, but data recovery remains the biggest challenge. Learn more about these iPhone statistics in Australia.
At the end of the day, prevention is your best defence. Once you have your iPhone up and running again, take two minutes. Go to Settings > [Your Name] > iCloud > iCloud Backup and make sure that little switch is green. It’s such a simple action that can save you a world of pain later on.
When It’s Time to Call in the Pros
Look, while the do-it-yourself methods are great, sometimes you just hit a wall. You can try every trick in the book, but if your iPhone simply refuses to cooperate, it might be time to hand it over to an expert. Pushing on when there's a deeper issue can sometimes do more harm than good. Knowing when to tap out is a skill in itself.
For instance, if you've been trying to get into Recovery Mode for what feels like an eternity and the phone isn't responding, you might be looking at a hardware problem. A dodgy button, a problem with the logic board, or even a battery on its last legs can stop those button combos from registering. The same goes for those cryptic error codes that pop up in Finder or iTunes – they're often a sign that the problem isn't just skin-deep.
Red Flags: When to See a Technician
If any of these situations sound familiar, it's probably a good idea to get a professional opinion. It’ll save you a world of frustration.
- Physical Damage: The screen is shattered or a button is stuck, making it physically impossible to perform the restore steps correctly.
- Recurring Errors: You’re repeatedly getting specific errors like Error 4013 or Error 1 in Finder/iTunes, even after swapping cables and trying a different computer.
- Water Damage: If your iPhone has had a swim, trying to power it up for a restore is risky business and could lead to more serious short circuits.
- Just Not Comfortable: You've read through the guides and honestly, you'd rather not risk it. And that's completely fine!
Bringing your device to a professional technician means you're not just guessing. They have the right diagnostic tools and, more importantly, the experience to figure out what's really going on, whether it's a software quirk or a hardware failure.
What to Expect at CTF Mobile Phones & Computer Repairs
When you bring your locked-out iPhone to our workshop here in Perth, the very first thing we do is a proper diagnosis. We need to check if there's an underlying hardware issue that's causing the problem before we even think about a software restore. This step is all about making sure we know exactly what we're dealing with.
Once we've pinpointed the issue, we'll explain the best way forward and give you a clear, upfront price – no nasty surprises. We deal with disabled iPhones every single day, so we can usually get them sorted out quickly and safely.
If you're in Perth's northern suburbs, from Karrinyup to Girrawheen, we're your local go-to. You can find out more about our full range of mobile phone repair solutions on our site. Letting a pro handle it just ensures the job gets done right, getting you back to using your phone without all the stress.
Common Questions About Disabled iPhones
After going through all those technical steps, you probably still have a few questions buzzing around. It's completely normal. Let's run through some of the most frequent things people ask us when they're staring at a disabled iPhone, so you can get a straight answer and figure out your next move.
Can I Unlock My iPhone Without Losing Data?
This is always the first question, and I wish I had better news, but the honest answer is no. Apple designed iOS security so that the only way to bypass a forgotten passcode is to completely wipe the device.
Be very wary of any software you find online that promises to unlock your iPhone without data loss. In my experience, these are almost always scams. Your only real safeguard against losing everything is having a recent backup.
My Computer Won’t Recognise My iPhone
This is a classic and frustrating roadblock. You've plugged your iPhone in, but it's just not showing up in Finder or iTunes. What now?
The fix for this is Recovery Mode. Think of it as a special boot-up state that forces your iPhone to communicate with your computer. It’s designed specifically for situations like this. Just follow the button-press sequence for your specific iPhone model we covered earlier, and your computer should be able to see the device and start the restore. If you've ever dealt with a disabled iPhone because of a forgotten iPhone passcode, this simple guide is a lifesaver.
The key takeaway is this: An official restore is your only guaranteed path to unlocking a disabled iPhone. It’s a security measure, not a flaw.
How Can I Prevent This from Happening Again?
A little bit of prevention goes a long way. The simplest thing is to pick a passcode you'll remember but that isn't too obvious.
Better yet, lean on Face ID or Touch ID for daily unlocking. This drastically cuts down on how often you need to punch in the code, which reduces the chance of forgetting it or getting locked out. If you have kids who use your phone, setting up Screen Time restrictions can be a great way to prevent them from accidentally disabling it after too many wrong guesses. For trickier problems, finding a professional for a phone repair near me is always a solid option.
If you're still stuck or just don't feel confident doing the restore yourself, the team at CTF Mobile Phones & Computer Repairs is here to help. Visit us online at https://www.ctf.com.au for professional, transparent, and fast service.