
That sinking feeling when you see a cracked or malfunctioning MacBook Pro screen is all too familiar. But before you jump to the worst conclusion, the first step isn't panic—it's a proper diagnosis. What might look like a complete hardware write-off could just be a software glitch, and telling the difference can save you a lot of time and money.
So, What’s Actually Wrong With Your MacBook Pro Screen?
Before you even think about ordering parts, you need to play detective. I've seen countless people waste money on a new screen when the real culprit was a loose cable or a driver issue. Getting the diagnosis right is the most critical part of the entire repair process.
Your MacBook Pro is giving you clues about what's wrong. By carefully observing the symptoms, you can figure out whether you're looking at a full screen replacement or a much simpler fix.
Reading the Telltale Signs
Is the screen totally black, or is it putting on a weird light show? Let's decode what these common symptoms are telling you about your machine.
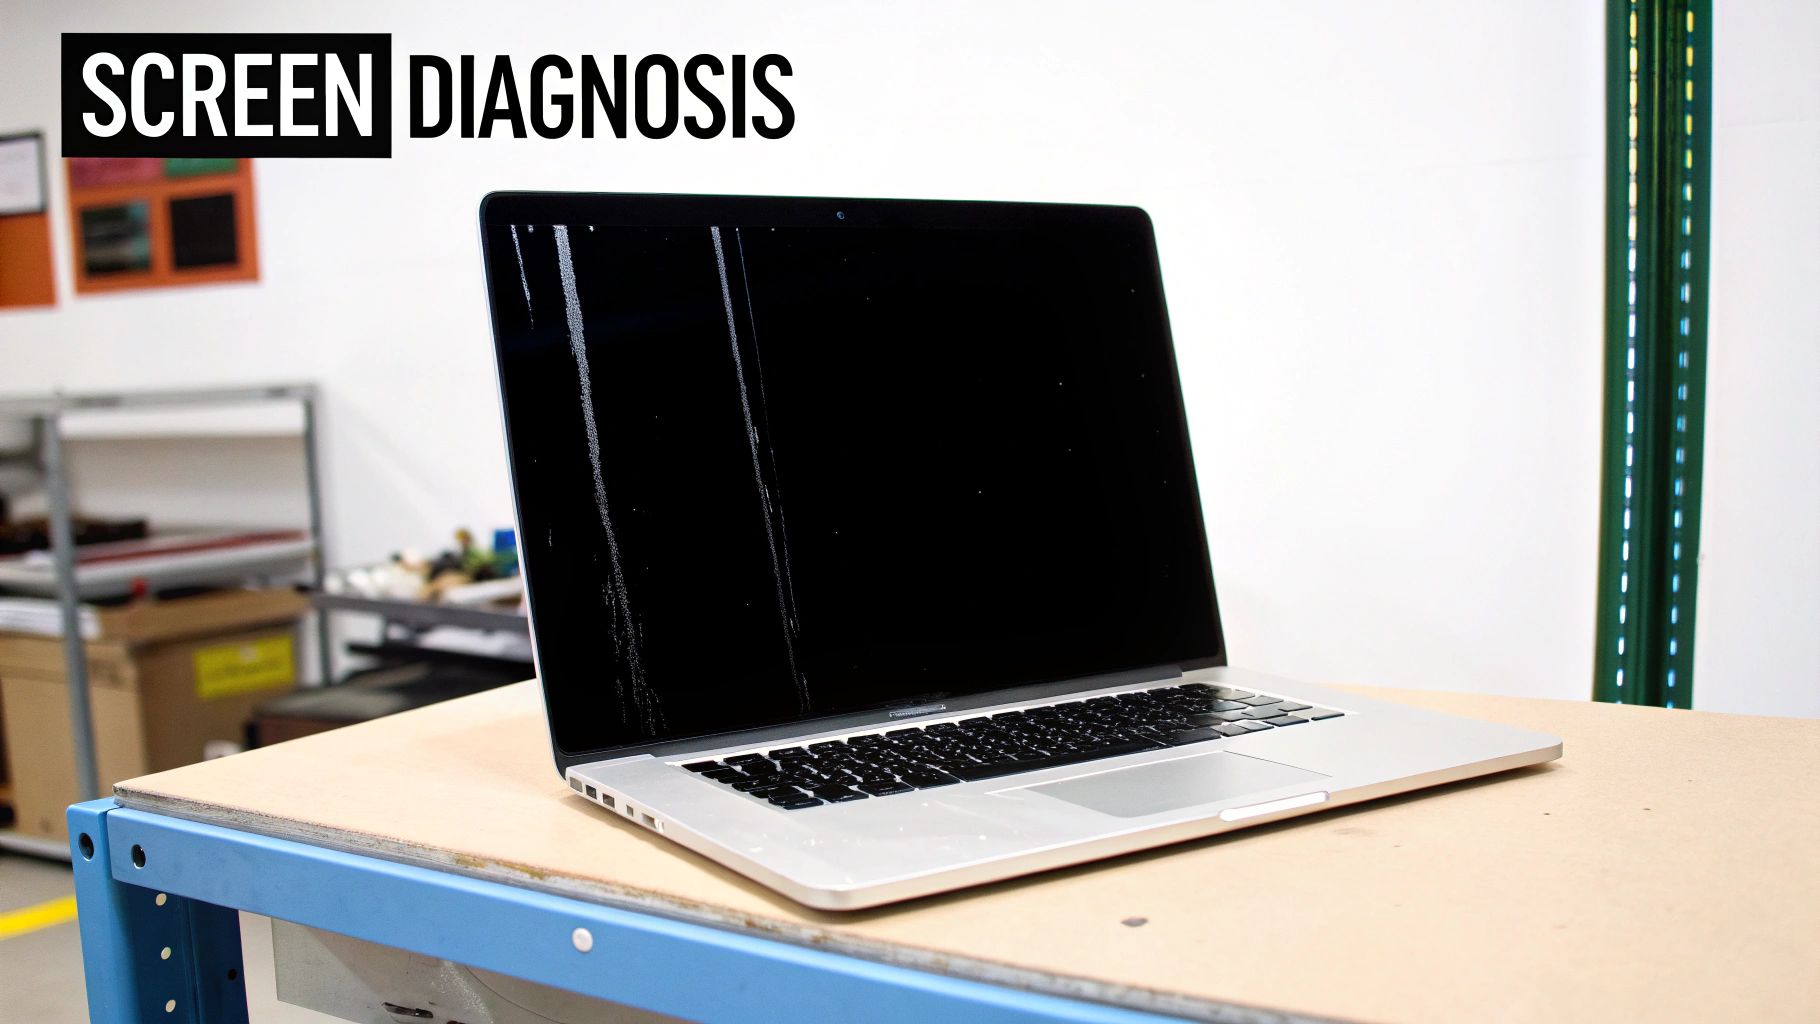
- Vertical or Horizontal Lines: This is a classic. If you see coloured lines running across your display, it almost always points to physical damage to the LCD panel itself or a problem with the connection to the logic board. It’s very rarely a software issue.
- A Flickering Display: This one’s a bit of a chameleon. It could be a dying backlight or a loose display cable. But I’ve also seen software bugs cause flickering, so it’s worth checking the simple stuff first before assuming the worst.
- Dead Pixels or Dark Spots: A few tiny black dots might be something you can live with. But if you see large clusters or spreading ink-like blotches—usually from an impact—that means the LCD panel is toast.
- The "Stage Light" Effect: If the bottom of your screen has an uneven pattern of bright spots, you've likely run into the infamous "Flexgate" issue. This is caused by a design flaw in the display's flex cables on certain models and unfortunately means you'll need to replace the whole assembly.
Here's a pro tip I always recommend: connect your MacBook to an external monitor or TV. If the picture on the second screen is crystal clear while your laptop's display is still messed up, you've just confirmed the problem is with the screen assembly itself.
Hardware vs. Software: Making the Right Call
Don't let a software gremlin trick you into an expensive hardware repair. A few quick checks can help you rule out a simple software conflict.
First, just restart your MacBook. You’d be surprised how often a simple reboot clears up temporary driver glitches. If that doesn't work, try booting into Safe Mode. If the screen problem vanishes in this stripped-back environment, the culprit is almost certainly software-related—maybe a dodgy app or a corrupted file.
One final test is to watch the screen closely as it boots up. If you see those lines or distortions on the Apple logo before the operating system even loads, that's a dead giveaway of a hardware fault. At that point, you can be pretty confident it's time for a physical repair.
DIY Repair vs Professional Service
So, you’ve done the troubleshooting and confirmed the worst: your MacBook Pro screen is physically broken. Now you’re at a fork in the road. Do you roll up your sleeves and tackle the replacement yourself, or hand it over to a professional? This isn’t just about the money; it’s a genuine balancing act between cost, risk, time, and your own comfort level with intricate electronics.
Making the right call here is crucial. A successful DIY job feels amazing and can definitely save you some cash. On the flip side, one small slip—a ripped ribbon cable or a stripped screw—can quickly turn a screen problem into a logic board catastrophe, costing you far more than a professional repair ever would.
The True Cost of a MacBook Pro Screen Replacement
Let's talk numbers, because that’s often the biggest factor pushing people one way or the other. In Australia, getting a MacBook Pro screen replaced officially isn't cheap. For a Retina display, you could be looking at anywhere from AUD $455 to over $755. For specific models like the A1706 or A1989, that figure can climb closer to AUD $900, especially if there's other damage. This is the premium you pay for genuine parts and expert labour, and it's what makes the DIY route so tempting.
Sourcing the parts yourself looks a lot cheaper at first glance. You can find aftermarket screen assemblies online for a fraction of a pro quote, but don't forget the hidden costs that creep in:
- Specialised Tools: You can't do this job with a standard screwdriver set. You'll need a P5 Pentalobe driver, a few Torx drivers, plastic spudgers, and suction cups. A decent toolkit will set you back another $50-$100.
- Shipping and Quality: Those bargain-priced parts often ship from overseas, which means long waits and a gamble on quality. A screen that shows up with dead pixels or poor colour accuracy is no bargain at all.
- The "Oops" Factor: This is the biggest hidden cost. Damaging the logic board, webcam, or delicate antenna cables during the repair can lead to expenses that completely wipe out any initial savings.
Weighing the Risks and Rewards
Money aside, you have to be brutally honest with yourself about the risks. A MacBook Pro is an incredibly compact and complex machine. Every single component is placed with precision for a reason.
The real question isn't "Can I save some money?" It's "Am I prepared for the consequences if this goes wrong?" When you pay for a professional service, you're not just buying a repair; you're buying experience, specialised equipment, and peace of mind.
A seasoned technician has done this exact repair hundreds, if not thousands, of times. They know all the little traps, like how to handle those fragile display cables to avoid the infamous "Flexgate" issue or which tiny screw goes where. More importantly, a reputable shop like CTF Mobile Phones & Computer Repairs guarantees their work with a warranty. If that new screen is faulty or something else goes wrong after the repair, it’s on them to fix it, not you. If you’re trying to find trustworthy technicians, our guide on finding phone repair near me has some great tips that apply to computer repairs, too.
For those running a repair business, managing bookings and client updates is key. A dedicated tool like a Telegram scheduler for phone repair shops can be a real game-changer for streamlining your workflow.
To make things clearer, let's lay it all out side-by-side.
Cost Comparison DIY vs Professional MacBook Pro Screen Replacement
This table breaks down the real-world differences between going it alone and hiring an expert here in Australia.
| Factor | DIY Repair | Professional Service (e.g., CTF Mobile Phones & Computer Repairs) |
|---|---|---|
| Upfront Cost | Lower (parts + tools) | Higher (parts + labour) |
| Total Time | 4-8 hours, not including research & part delivery | 1-2 hours, often with same-day service available |
| Risk Level | High. One mistake can cause costly, irreparable damage. | Low. The work is backed by a warranty. |
| Part Quality | Variable. A gamble with aftermarket parts. | Guaranteed. High-quality parts tested for compatibility. |
| Required Skill | High technical proficiency and steady hands are a must. | None. Just drop off your device. |
Ultimately, the decision is yours. If you're an experienced electronics hobbyist with the right tools and a healthy tolerance for risk, a DIY MacBook Pro screen replacement can be a rewarding project. For almost everyone else, the security, speed, and guaranteed outcome of a professional service offer value that easily outweighs the extra cost.
Gathering the Right Tools and Parts
Trying to replace a MacBook Pro screen is a bit like performing surgery. You wouldn't go into an operating theatre with a rusty wrench, and you shouldn't approach this repair with the wrong tools. This isn’t a job for that generic screwdriver set you have in the garage; success comes down to having the right precision instruments and a top-quality screen that’s an exact match for your Mac.
Honestly, getting this part right is probably the most important step of the whole process. It’s how you avoid stripping tiny screws, guarantee compatibility, and prevent that sinking feeling when you realise you’ve got the wrong part halfway through the job.
Your Essential Toolkit
First things first, forget about those bulky, all-in-one driver kits. A MacBook Pro is held together by specialised screws that need very specific drivers. Using the wrong one is the quickest way to strip a screw head, turning what should be a simple repair into an absolute nightmare.
Here’s what you absolutely must have:
- P5 Pentalobe Screwdriver: This is for the screws on the bottom case of most modern MacBooks. Nothing else will do the job without causing damage.
- Torx Screwdrivers (T3, T5, T8): You'll find a variety of these tiny star-shaped screws holding down everything from the battery connector and display cables to the logic board itself.
- Plastic Spudgers and Opening Picks: Metal tools will scratch your MacBook’s finish and can easily damage the delicate connectors inside. These plastic tools are non-negotiable for safely prying the case open and disconnecting ribbon cables.
- Suction Cup: A small, good-quality suction cup is a lifesaver. It gives you the grip and leverage you need to gently lift the screen assembly away from the body.
- Isopropyl Alcohol and Microfibre Cloths: Perfect for cleaning off old adhesive, gunk, and fingerprints. You want a perfectly clean surface before installing the new screen.
A classic mistake I see all the time is people trying to jam a small Phillips head driver into a Torx screw. It might seem like it fits, but I promise you it will chew up the screw head. Just invest in a proper electronics repair kit—it’s a small price to pay to avoid a massive headache.
Finding the Right Replacement Screen
Once you’ve got your tools sorted, the next hurdle is sourcing the actual screen. This is where so many DIY repairs fall flat. Not all screens are made equal, and fitting an incompatible or low-quality part will almost certainly lead to weird colours, a dead backlight, or sensors that just don't work. This is a universal truth in device repairs; our guide on how to replace a phone screen hits on this same point about the importance of part quality.
Before you buy anything, you need to find your MacBook Pro’s specific model number. Don't just go by the year, like "2018 15-inch." Flip your MacBook over and look for the tiny print on the bottom case. You’re looking for a model number that starts with an "A," like A1989 or A2141. That number is your golden ticket to finding a screen that will actually work.
With your model number, you'll find a few different types of screens out there.
| Screen Type | Description | Pros & Cons |
|---|---|---|
| OEM (Original Equipment Manufacturer) | An identical part to what your MacBook came with, often pulled from another machine. | Pro: Flawless quality and guaranteed compatibility. Con: Hard to find and usually the most expensive. |
| OEM-Equivalent | Made in the same factories as Apple's parts but sold through other suppliers. | Pro: Excellent quality, often identical to the original. Con: You need a supplier you can trust to verify it’s the real deal. |
| Aftermarket | A third-party copy of the original part. | Pro: The cheapest option by far. Con: It’s a total gamble—expect potential issues with brightness, colour accuracy, and how long it lasts. |
Checking out your supplier is absolutely critical. Look for sellers who have lots of genuine positive reviews, a clear warranty policy, and are easy to get in touch with. If you see a screen listed for a price that seems too good to be true, it almost certainly is. Those are usually low-grade aftermarket parts that will only end in disappointment. Spending a little more on a quality part from a reputable seller is the best insurance you can get for a successful repair.
The MacBook Pro Screen Replacement Process
So, you’ve got your tools and a quality replacement screen ready to go. Now for the main event. This is where patience really pays off. Rushing through the repair is the quickest way to turn a manageable job into a costly disaster. Take a breath, clear your workspace, and let's get this done right.
We'll walk through the entire process, breaking down this complex task into clear, manageable phases. I’ll cover everything from the first screws and critical safety steps to carefully installing the new display.
This diagram gives you a bird's-eye view of the prep work involved.
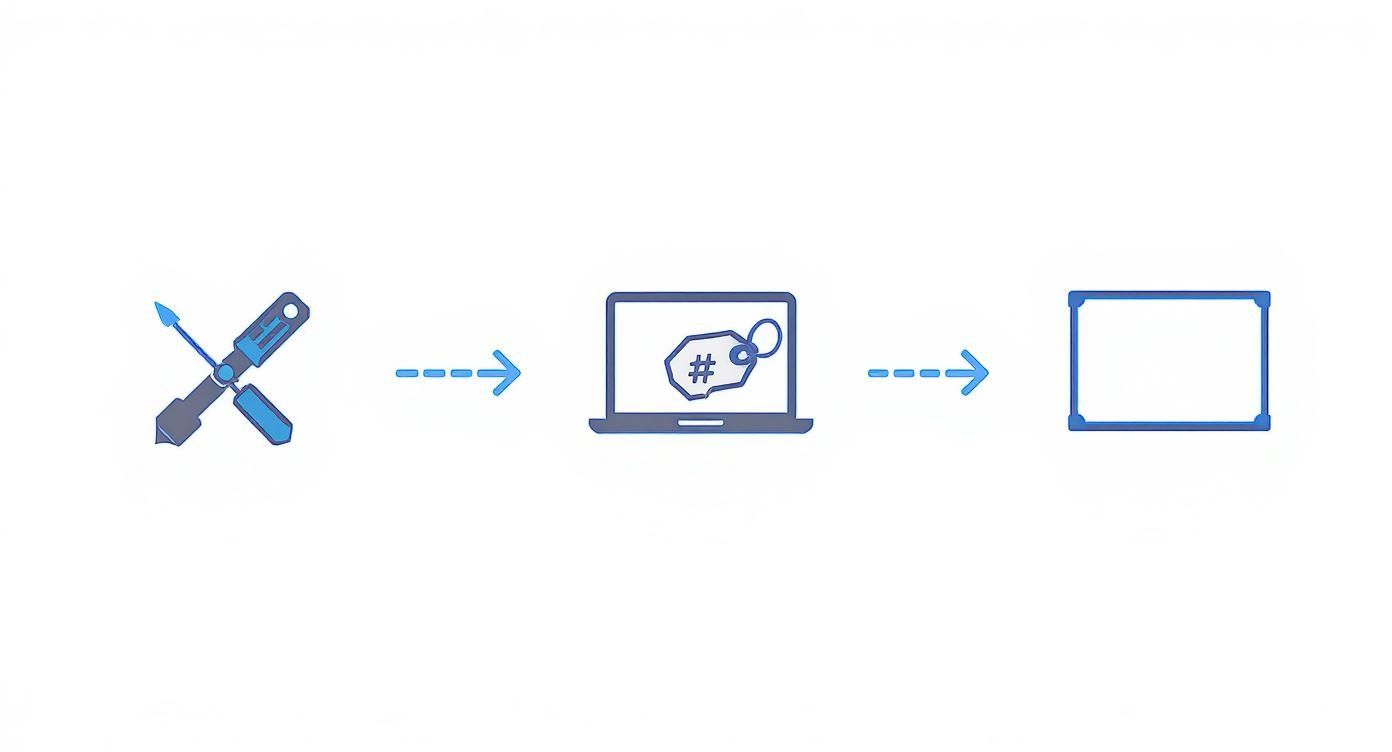
As you can see, success starts before you ever touch a screwdriver. It’s all about having the right tools, confirming your model number, and sourcing a compatible screen.
Preparing Your Workspace and MacBook Pro
Before you even think about opening your laptop, set up a proper workspace. It needs to be clean, well-lit, and static-free. A kitchen table works fine, but lay down a soft, lint-free cloth to avoid scratching the aluminium casing.
You'll also need a way to keep track of the tiny screws you're about to remove. A magnetic screw mat is a lifesaver, but honestly, an empty ice cube tray or even a piece of paper with labelled sections will do the trick.
Now for the most important step: disconnect the battery. This isn’t optional; it's a non-negotiable safety rule. Leaving the battery connected is like working on a live circuit. One accidental slip with a metal tool could fry the logic board, and that’s a far more expensive problem to fix.
Once you’ve removed the bottom case, you'll see the battery connector. Use a plastic spudger—never metal—to gently pry it straight up and away from the logic board. Make sure it's tucked aside so it can't accidentally touch the contacts while you work.
Removing the Damaged Display Assembly
With the battery safely disconnected, it's time to focus on the display. The entire top half of your MacBook is connected to the bottom with a few delicate ribbon cables and some tiny coaxial connectors for things like the display signal, webcam, and Wi-Fi antennas.
These things are fragile, so go slow. Use your plastic tools to carefully disconnect them. Look closely for the tiny locking levers or adhesive strips holding them down. The main display data cable, for instance, usually has a small flip-up tab that you have to open before the cable can slide out.
A huge pitfall for first-timers is damaging the Wi-Fi and Bluetooth antenna connectors. They’re tiny, press-on plugs that are very easy to crush. Use the flat edge of a spudger to gently pry them straight up off their posts. Whatever you do, don't pull on the wires.
After all the cables are free, you can undo the screws holding the display hinges to the main body. These are often a different type (like a Torx T8), so keep them separate. At this point, you should be able to carefully lift the whole damaged screen assembly away from the laptop.
Installing the New MacBook Pro Screen
Now, just do everything in reverse. Start by carefully aligning the hinges of the new display with the mounting points on the MacBook’s body. Thread the hinge screws in, but don’t crank them down just yet—leaving them slightly loose gives you a little play for perfect alignment.
Reconnecting the ribbon cables is easily the most delicate part of the whole job. It takes a steady hand. You need to make sure each cable is perfectly straight and aligned with its socket before you gently push it in and secure any locking tabs. A crooked cable is the number one reason for a black screen or a dead webcam after a repair.
- Display Data Cable: This is the big one. Make absolutely sure it's fully seated before you flip the locking bar down. A partial connection will give you a blank screen or weird visual artefacts.
- Webcam (iSight) Cable: It’s smaller, but just as important. If the connection isn't solid, macOS simply won't see your camera.
- Antenna Coaxial Cables: These are often the most frustrating. Line the connector up perfectly over its post on the logic board and press down gently with the tip of a spudger. You should feel a tiny, satisfying "click" as it snaps on.
Once every cable is securely connected, you can go ahead and fully tighten the hinge screws. Before you seal everything up, it’s a good idea to do a quick test.
Final Steps and Initial Testing
With the new screen hooked up, it’s the moment of truth. Carefully reconnect the battery connector to the logic board, but leave the bottom case off for now. Hit the power button.
Seeing that white Apple logo appear is a fantastic sign. It means you’ve successfully completed the most critical part of the replacement and the main display connection is working.
Don't start celebrating just yet, though. This is just the first check. A full test is needed to make sure every single function is working as it should, which we'll get into next. But for now, if the screen powers on, you can shut the MacBook down, disconnect the battery one last time for safety, and then screw the bottom case back on. The hardest part is behind you.
Post-Repair Checks and Troubleshooting

You’ve carefully installed the new display, put the last screw back in, and breathed a huge sigh of relief as the Apple logo appears. But hold on—the job isn't quite finished. One of the most common mistakes people make is skipping a thorough post-repair check, which can lead to major frustration down the track.
Now's the time to be meticulous. This final quality control phase is what separates a good repair from a great one. It's your last chance to catch any small issues, like a slightly misaligned cable or a sensor that isn't quite connected, while the whole process is still fresh in your mind.
A Complete Functional Test Checklist
Just seeing the screen power on is only the first step. You need to systematically test every single component that's linked to the display assembly. This is crucial because when you replace screen macbook pro, it's surprisingly easy to knock something else out of place.
Run through this checklist methodically:
- Display Quality Check: Hunt for any dead pixels (tiny black dots) or stuck pixels (dots that stay one colour). An easy way to do this is to display a full-screen white or black image. Also, scan for uneven backlighting or "pressure spots," which are tell-tale signs of a trapped cable or screw pushing on the panel from behind.
- Brightness Control: Use the function keys to test the full range of brightness. The display should dim and brighten smoothly without any flickering or hesitation.
- Webcam (FaceTime Camera): This is a simple one. Open the FaceTime or Photo Booth app to make sure the camera is working. If your Mac complains about "No Camera Connected," it's almost always a sign that the camera cable isn't seated properly.
- Ambient Light Sensor: That tiny sensor next to the webcam adjusts your screen's brightness automatically. To test it, just cover the sensor with your thumb—the screen should dim. Then, uncover it near a bright light, and it should brighten back up.
The most overlooked test is for the wireless antennas. The Wi-Fi and Bluetooth antennas are actually housed within the screen assembly. If your connection is suddenly weak or keeps dropping after the repair, it’s a dead giveaway that one of those tiny coaxial cables hasn’t been snapped on correctly.
Troubleshooting Common Post-Repair Problems
Even when you’re incredibly careful, things can still go wrong. The good news? Most issues after a screen replacement are caused by simple connection problems, not a faulty new screen. Before you start to panic, check these common scenarios and their likely fixes.
Problem: The screen stays completely black, but you can hear the startup chime.
- Likely Cause: The main display data cable is the prime suspect. It's either not pushed all the way into its connector on the logic board, or its locking tab wasn't secured. This is, by far, the most common reason for a dead screen after a repair.
- The Fix: Power down the MacBook completely, disconnect the battery again, and carefully re-seat that main display cable. Make sure it's perfectly straight and pushed all the way in before you close the little latch.
Problem: The colours on the new screen look weird—washed out, distorted, or tinted.
- Likely Cause: This is another classic symptom of a partially connected display cable. If even a single pin isn't making solid contact, it can throw off the entire colour profile of the screen.
- The Fix: Just like with a black screen, the first thing to do is check that main data cable. Re-seating it properly almost always clears up any colour issues right away.
Problem: Wi-Fi or Bluetooth is flaky, or the signal range is terrible.
- Likely Cause: Those tiny, delicate antenna cables are the culprits. They have to be aligned perfectly over their posts on the logic board and snapped on with a satisfying "click."
- The Fix: This one can be a bit fiddly. You’ll need to open up the MacBook again, disconnect the battery for safety, and very carefully reseat the antenna cables. I recommend using a plastic tool to apply gentle, even pressure straight down. Whatever you do, don't force them.
Running through these final checks gives you the confidence that your repair was a success. It confirms the new screen is flawless and all the related functions are working exactly as they should, letting you finish your MacBook Pro screen replacement on a high note.
Common Questions About MacBook Screen Replacements
When your MacBook screen breaks, you’re suddenly faced with a lot of questions and a heap of confusing advice online. It’s easy to feel overwhelmed. Let's cut through the noise and answer the most common things people ask, so you can figure out what to do next with confidence.
These are the real-world questions that pop up, covering everything from warranty worries to the nitty-gritty technical details of the repair itself.
Will a DIY Screen Replacement Void My Apple Warranty?
The short answer is yes, almost certainly. If your MacBook Pro is still under its original warranty or you’ve got AppleCare+, cracking it open yourself to do a repair will immediately void that coverage. Apple builds its machines to be serviced only by their certified techs, and a DIY job breaks that seal.
Here's the real kicker: even if you do a perfect job on the screen, if another problem pops up later—say, with the logic board—Apple will likely refuse to service it under warranty once they see evidence of tampering. For newer machines, that’s a massive risk. If you’re working with an older MacBook that’s long out of warranty, then this isn't as much of a concern.
Can I Just Replace the Glass Instead of the Whole Screen?
On the old, non-Retina MacBook Pros (think pre-2012 models), you could often get away with just replacing the outer glass panel. But for pretty much any modern MacBook Pro with a Retina display, that’s a definite no-go.
These days, the glass, the LCD panel, and the backlight are all laminated together into one single, sealed unit.
This integrated design is what allows for those incredibly thin and crisp displays, but the trade-off is repairability. Trying to separate the layers is a recipe for disaster and will almost always destroy the entire panel. That’s why you have to replace the whole display assembly in one go.
This is a really important detail to understand because it's the main reason why parts to replace screen macbook pro models from the last decade are more expensive.
What Is True Tone and Will It Work After a Screen Replacement?
True Tone is that clever Apple feature that uses ambient light sensors to automatically adjust your screen's colour and brightness to match the room you're in. It's what makes the display look more natural and easier on the eyes, almost like paper.
For True Tone to keep working, the new screen has to be able to "talk" to your MacBook's logic board correctly.
- Using an OEM or high-quality screen: These parts are built to spec and include the necessary chips, so True Tone should work just fine after the swap.
- Using a cheap aftermarket screen: This is where you run into trouble. Many budget screens cut corners and don't have the right hardware, meaning you'll lose True Tone for good.
- Professional Service: A good repair shop will not only use quality parts that support True Tone but will also have specialised tools to reprogram the new screen to ensure it pairs perfectly with your Mac.
Losing this feature might not sound like a huge deal, but it's one of those little things that tells you a lot about the quality of the replacement part. While we're talking about MacBooks, the principle of using quality components to keep all features working is universal, which you can read more about in our guide to common mobile phone repair issues. Choosing the right part is the difference between a good repair and a great one.
If you're dealing with a broken screen and just want it fixed right—without the hassle and with all your MacBook's features intact—it's best to trust the experts. CTF Mobile Phones & Computer Repairs offers same-day professional screen replacements in Perth using top-quality parts, and we back our work with a solid warranty. Don't risk your device; get a fast and reliable repair today.